Programming

Becoming an Entrepreneur as a Software Engineer Vol 1

This is the first post in what I plan to be a series.  In these posts, I will explore ideas in entrepreneurship.  It’s a given that working for yourself, while it brings many risks, can bring many rewards.  I believe that it is one of the only ways to achieve freedom from the daily grind and to meet long term financial goals.

Benefits Of Working For Yourself

  • Achieve – The sky is the limit.
  • Vision – Your the one with the vision (for the company and/or product).
  • Destiny – You make your own destiny.
  • Freedom – You call the shots.
  • Profit – As owner, you reap the rewards.

What I Think Works

My thoughts on what works will probably change a lot over time, but currently I think one of the best ways to become a successful entrepreneur is to develop applications, websites, devices, etc that are an improvement to a larger company’s product in the hopes that they buy out your company.  For example, $10 million is a lot for an individual working the daily grind, but pocket change to large corporations.  Buying other companies is at the heart of how Apple, Google, Microsoft, Facebook, or any other major companies acquire new technology and features so it definitely works for some people.  Think of whatever your company is bought for as excellent seed money into the next.  The big “but” here is don’t undersell either.  If you can see a larger valuation for your company/product, stick with it and don’t take a buyout.

What Doesn’t Work – Writing Books

Apparently, writing books isn’t as profitable as you would think.  If you listen to the Entreprogrammers podcast, you’ll hear just how much they make on their books.  While I don’t remember the exact numbers they say, it wasn’t a lot (only a fraction of a good year’s salary).  It’s enough to make me think that unless you are some big publishing company its simply not worth your time and effort.

Posted by Chad Dotson in Programming, Software Engineering, Work, 0 comments

My Swift App – An Ongoing Experiment

Work is progressing on my first iOS app written in Swift.  I think that I might have a rudimentary alpha product ready to start testing in a few weeks.  Based on my experience with it so far, here are some of my thoughts, observations, and concerns.

  • Developing in Swift is as the name implies, “Swift.”  I didn’t know anything about Objective-C nor Swift before I started my app and I think I’m making decent progress given the amount if time I’ve had to work on it.  Given proper resources, I believe its possible to progress Swift apps from concept to production in a matter of weeks.
  • Language resources (documentation and examples) are still pretty sparse.  Get ready to learn a little Objective-C if you need help with API calls because that is where the majority of the help you will find will be.
  • The iOS 8 Simulator doesn’t save location privacy settings,  That means that every time you run an app that requires location privileges, you have to edit the settings again.  Based on what I’ve read, this issue has existed for some time in the beta code.
    This was due to user error.  You have to use either the location manager’s requestWhenInUseAuthorization or requestAlwaysAuthorization functions paired with the right entries in your projects Info.plist file.  The reason mine wasn’t working was I had erroneously edited the plist file associated with the unit tests.

    <key>NSLocationWhenInUseUsageDescription</key>
    <string>Use location when open?</string>
    <key>NSLocationAlwaysUsageDescription</key>
    <string>Use location always?</string>
  • Perhaps the biggest issue is that Xcode cannot refactor Swift code.  To me this seems like a giant shortcoming of the editor.  Hopefully Apple will push an update soon to correct this.
  • While storyboards are powerful, some of the functionality is not so discoverable.  The auto-layout functionality took me awhile to find and not without searching the net.  I think they maybe onto something, but I do tend to like the way Visual Studio makes similar functionality “findable” from the properties panel.
  • As of Xcode 6.0.1 and iOS Simulator 8.0, AVSpeechSynthesizer doesn’t appear to work at all.
    var mySpeechSynthesizer:AVSpeechSynthesizer = AVSpeechSynthesizer()
    var myString:String = "This is a test."
    var mySpeechUtterance:AVSpeechUtterance = AVSpeechUtterance(string:myString)

    When executed in the iOS simulator, the code results in “Speech initialization error: 2147483665”.  I’ve seen a few work arounds on the net, but I don’t believe any of them actually work in Swift.

Posted by Chad Dotson in Programming, Software Engineering, 2 comments

Swift – A Quick First Impression

Swift and Xcode 6

Late last week Apple released Xcode 6 to the general public.  I’ve been waiting for the opportunity to try out Swift, so I started working on an idea I’ve had.

General Thoughts

This is probably a general iOS development comment, but the way you link items on the storyboard to class members seems odd to me (having done a lot of C# development in the past).  However, it does have its advantages.  Counter to the Microsoft environment, it does seem to encourage better design and discourage the worse of some bad habits.

Compared to Android

Its been awhile since I worked with Android, but when I did developing for the platform was disastrous.  Setup of the environment (Eclipse) and the emulator was time-consuming and not so straight-forward.  With Xcode, its all on rails.  You can have a “Hello World” app up in the simulator in 2 minutes.

Problems

The language does seem to be a little wordy at first glance maybe that opinion will get better as I get more experience with it.  While the official Apple documentation is now complete with Swift equivalents to Objective-C,  examples both official and third party are pretty few and far between it seems.

To be continued…

Posted by Chad Dotson in Programming, 0 comments

DSLR Lightning Trigger

June 15, 2011 Lightning CompositeLightning

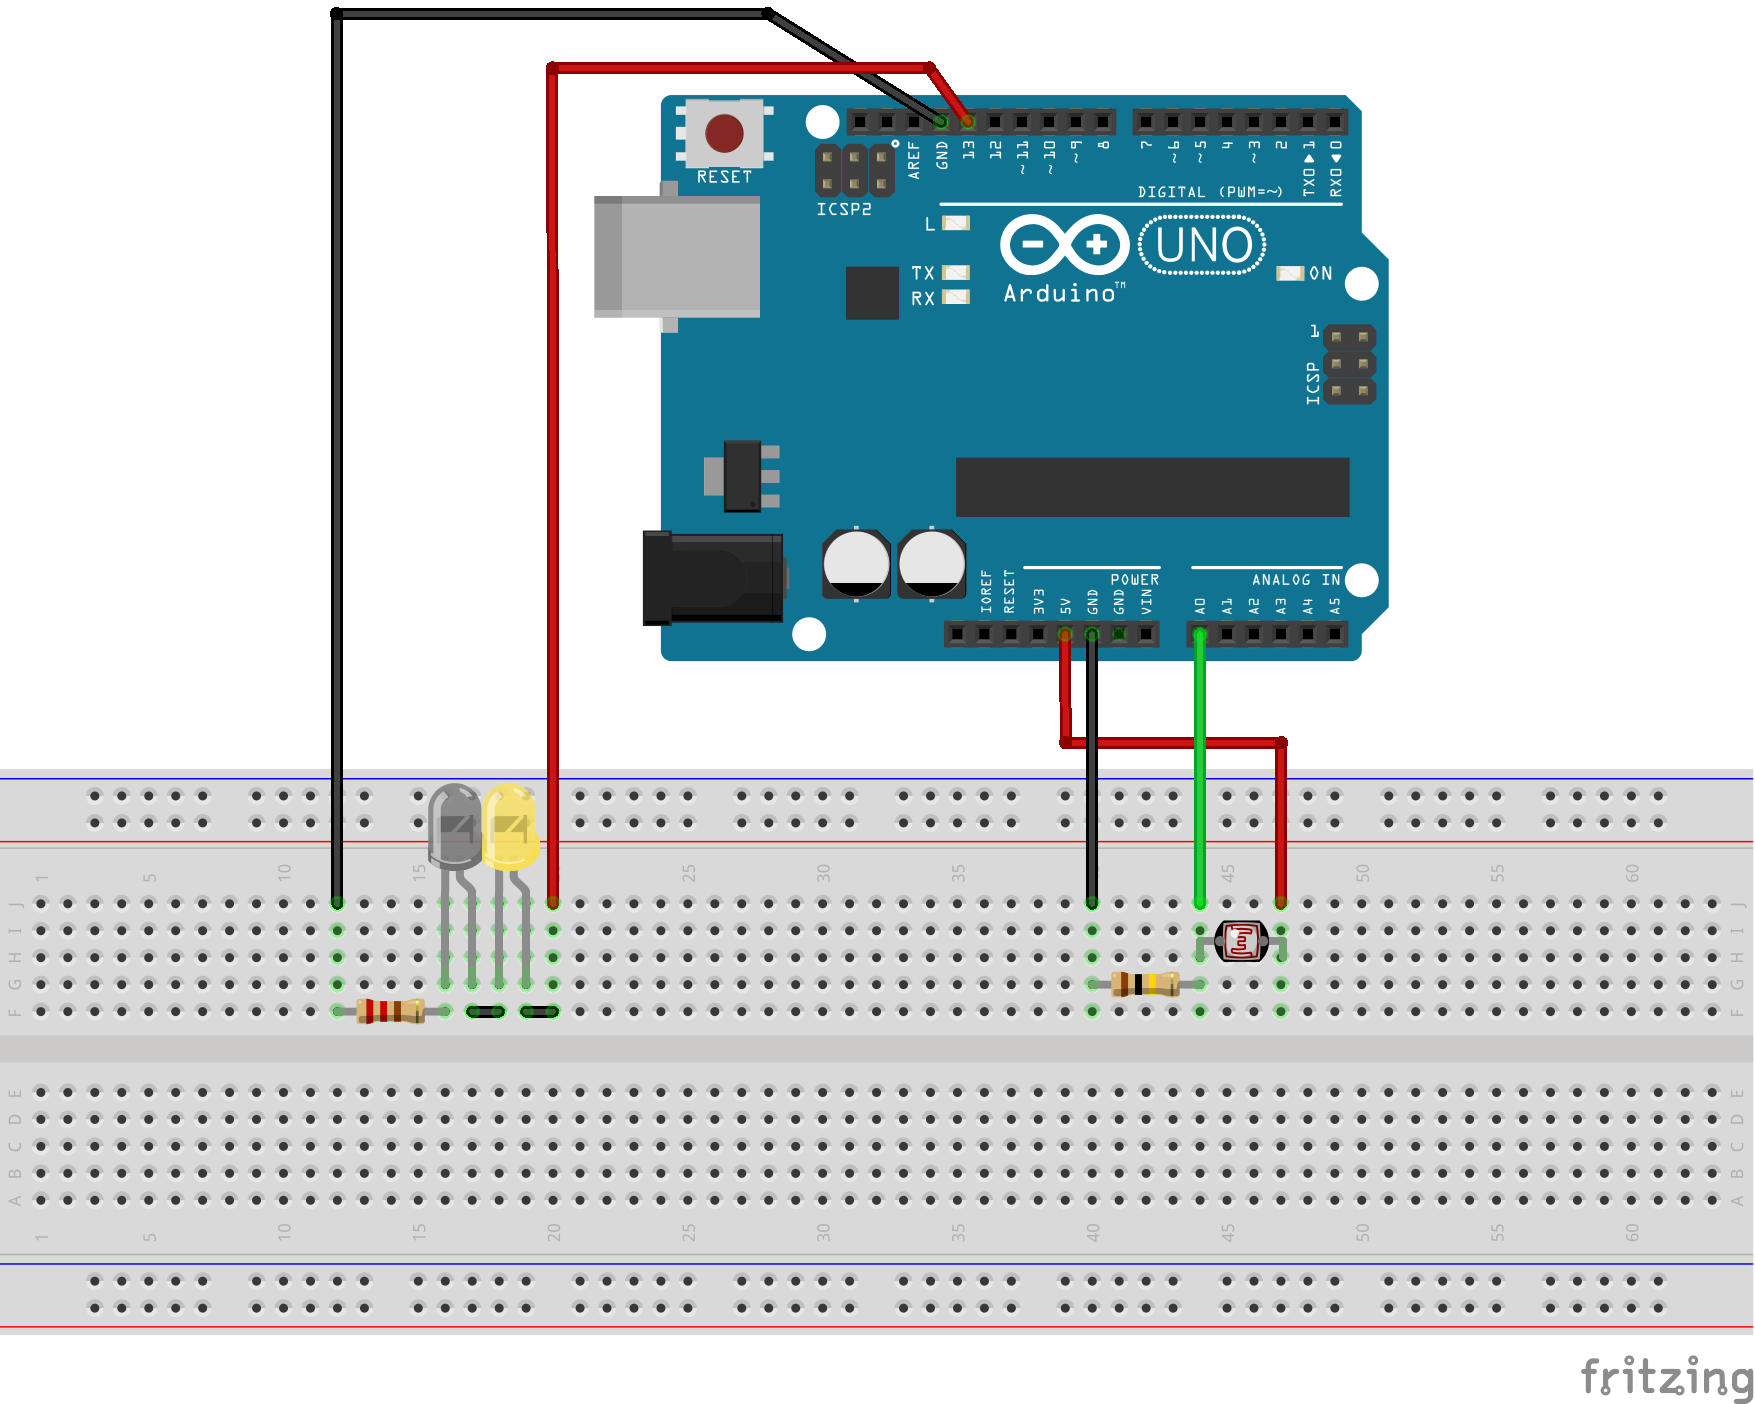
I use my Nikon D5000 to take a lot of lightning photos.  This one to the right is a composite of several taken during a storm that produced a good amount of of photogenic lightning a few years back.  The photos that make up this one and many of my others were created using timed exposures of up to 30 seconds on length.  This is problematic, at times, due to other light sources, camera movement, etc.  Using simple, arduino-based circuit, we can create a device that will attempt to detect lightning strikes and trigger a camera shutter when one is detected.

Prototyping The Circuit

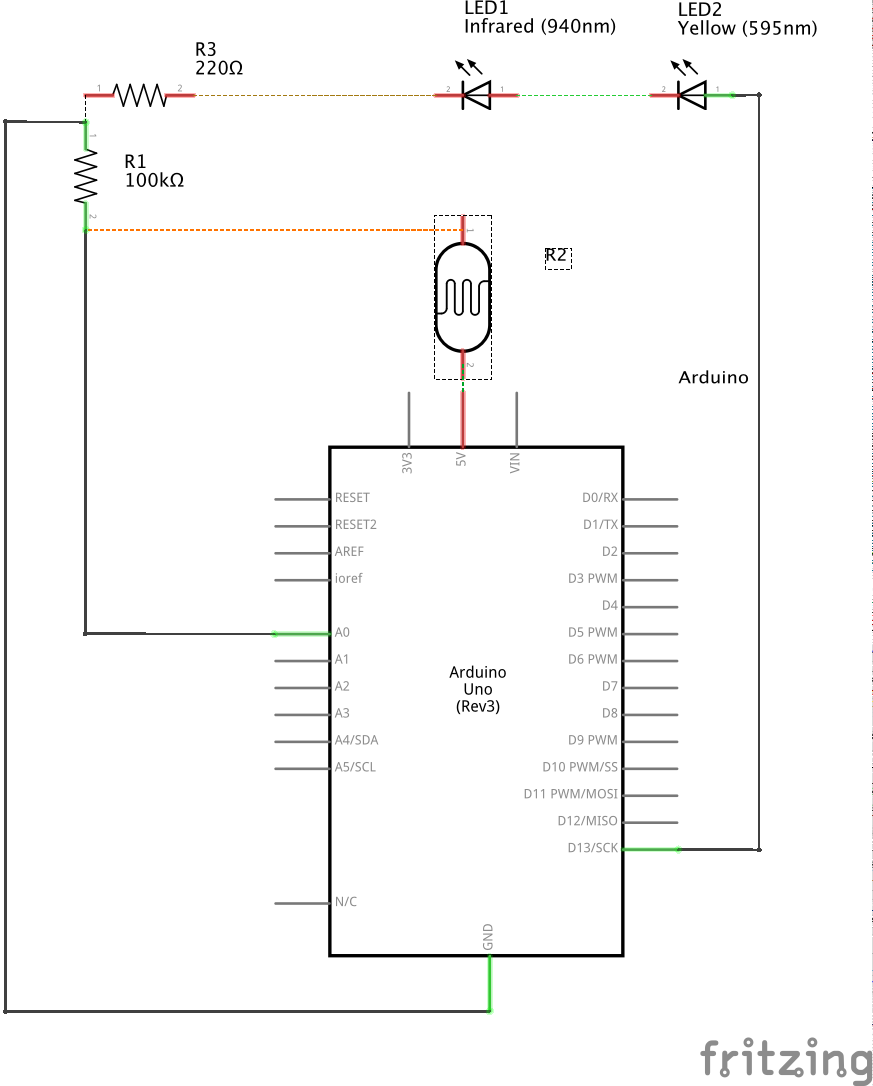
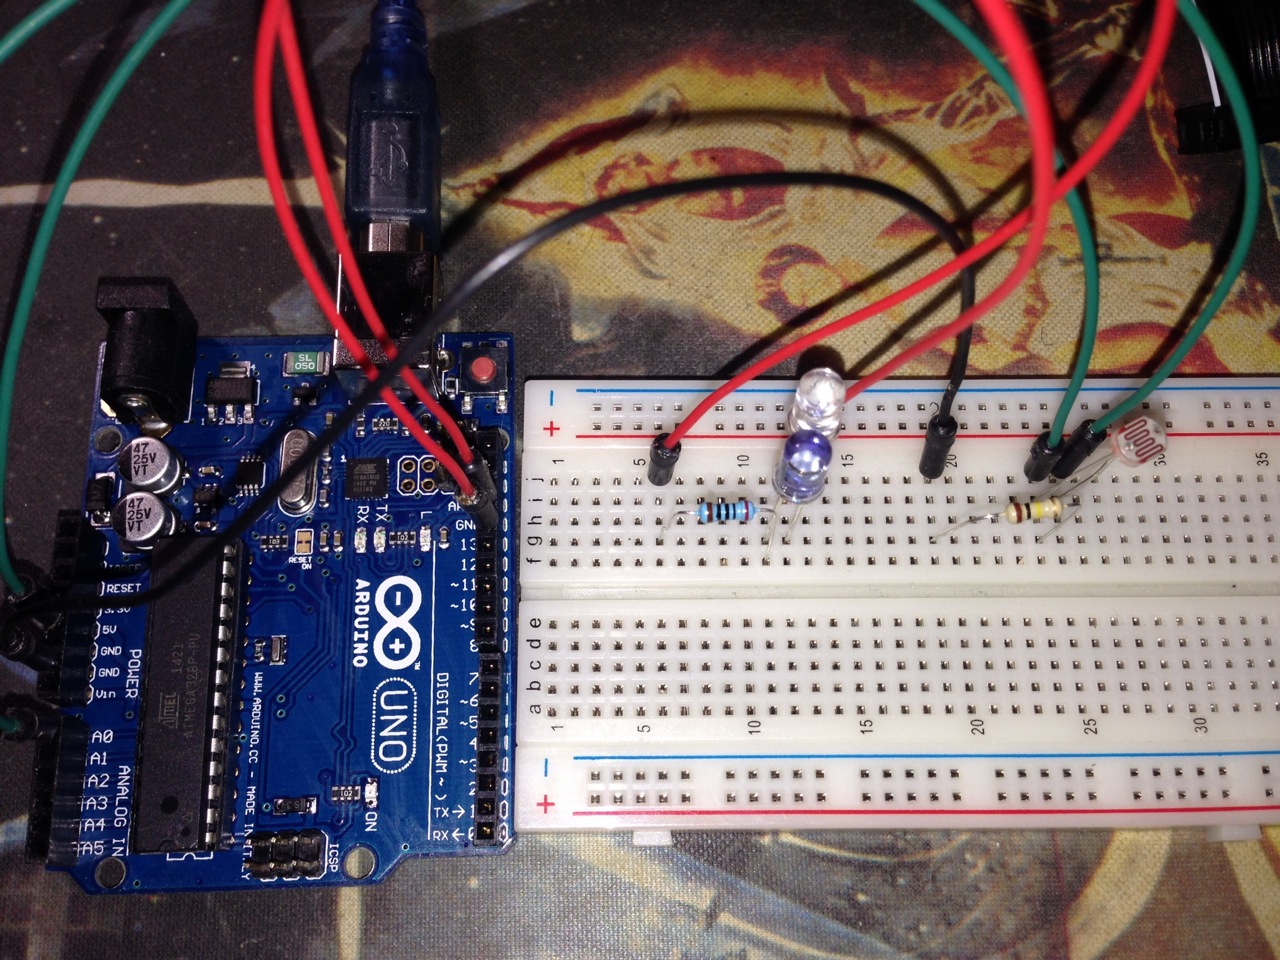
This circuit consists of 2 major pieces: lightning detection and shutter triggering.  To detect lightning, a phototransistor or photoresistor is required.  For this project, I used a photoresistor.  To trigger the shutter, a 940nm infrared LED is required.  These LEDs can be used to trigger cameras from Nikon, Canon, Pentax, Olympus, Minolta, Sony and possibly others.  Below is the complete parts list I used along with links to them on Amazon.

Components:

  • Arduino UNO R3 (buy)
  • Photoresistor 5mm GM5539 (buy)
  • 940nm Infrared LED (buy)
  • Yellow LED (buy)
  • 1 – 200 Ω Resistor (buy)
  • 1 – 100k Ω Resistor (buy)
  • Miscellaneous jumpers and breadboard (buy)


The Code

This circuit’s method of detecting lightning with a photoresistor is pretty simplistic.  It simply loops infinitely recording the analog input from the photoresistor, taking the difference of it to the saved value, and comparing that to the configurable threshold.  In its current configuration, it will take 2 photos per lightning strike.  This is the first iteration of this code, so I may change it to use a moving average instead of just the last recorded value.

To fire the IR LED in the right sequence, I used the Multi-Camera IR Control Library since it supports my Nikon D5000.  In addition to the D5000, this library supports Nikon, Canon, Pentax, Olympus, Minolta, and Sony cameras. If you don’t have a camera that is supported, a custom interface could easily be created with specifics for your camera model.

#include <multiCameraIrControl.h> 

int shutterPin = 13; 
int triggerPin = 0;
int threshold = 5;
int savedLightningValue = 0;
int currentLightningValue = 0;
int delayBetweenShots = 1000;
 
Nikon D5000(shutterPin);

void setup() {
  Serial.begin(9600);
  pinMode(shutterPin, OUTPUT);
  digitalWrite(shutterPin, LOW);
  savedLightningValue = currentLightningValue = analogRead(triggerPin);
}

void loop() {
  currentLightningValue = analogRead(triggerPin);
  Serial.println(savedLightningValue, DEC);
  
  if(abs(currentLightningValue - savedLightningValue) > threshold) {
    Serial.println("Triggering shutter");
    D5000.shutterNow();
    delay(delayBetweenShots);
  }
  savedLightningValue = currentLightningValue;
}


To The Field

Since the protoype is fully functional, I plan on fielding it during the next thunderstom.  I will report back once I see how it works along with any refinements.

Resources

As always, I have placed the code and diagrams for this project in a github repository.  It includes code that can be compiled and uploaded via the Arduino IDE and diagrams that can be viewed or edited with Fritzing.

Other Posts in this series:

Posted by Chad Dotson in Arduino, Hobbies, Photography, Programming, Raspberry Pi, Software Engineering, Technology, 8 comments

Comparing Node.js and Python on the Raspberry PI

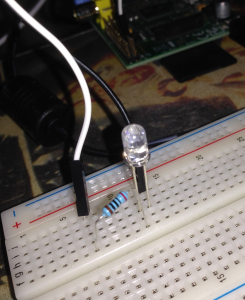
Picture of my simple led circuit connected to the Pi.

Picture of my simple led circuit connected to the Pi.

Programming on the Raspberry Pi

Python seems to be the more popular language for writing programs on the Raspberry Pi.  However, it is far from the only language: Python, C, C++, Java, and Ruby are some that are automatically supported out of the box.  As it turns out Node.js is also supported.  Perhaps, just based on my preconceptions, I didn’t originally consider JavaScript when interfacing directly with hardware.  The goal of this article is to compare functionally equivalent sample programs written both in Python and JavaScript.


The Goal

I decided to make the scope of the problem created for this article as small as possible.  Given that the goal will be to create simple circuit diagram consisting of a LED and then to write a program that makes the LED flash for a specified period of time.
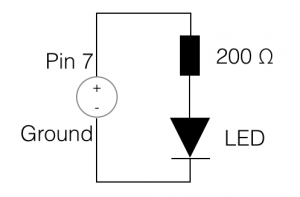
 

Simple LED circuit diagram

Simple LED circuit diagram

Hardware

With the Pi, a circuit that will make a LED flash is relatively simple: Consisting of just a LED and resistor.  I arbitrarily selected pin 7 on the Pi for this build.  I’ve included a diagram of it on this page.


Software

As the goal states, the following two implementations do nothing except toggle an LED at half the specified duration (0.5s) and automatically shutoff after 60 seconds.


Python

Since Python is the more traditional programming language for the Raspberry Pi, let us start with it.  The Rpi.GPIO module I used can be installed via pip.  Before you read the code sample, let me point out some things about the implementation.  Could it have been done simpler given that the problem was just to make the LED flash for a certain amount of time?  Yes, but I wanted to create something of an asynchronous process that could be controlled from outside its execution context.

import RPi.GPIO as GPIO

from threading import Event, Thread, Timer

class ImprovedThread(Thread):
    def __init__(self, *args, **kwargs):
        super(ImprovedThread, self).__init__(*args, **kwargs)
        self._stopEvent = Event()

    def stop(self):
        self._stopEvent.set()

    def is_stopped(self):
        return self._stopEvent.isSet()

    def wait(self, duration):
        self._stopEvent.wait(duration);


class LEDFlasher(ImprovedThread):
    def __init__(self, pin, duration):
        super(LEDFlasher, self).__init__(target=self._flashLED)
        self.setDaemon(True)

        self._pin = pin
        self._duration = duration
        self._state = False

        GPIO.setmode(GPIO.BOARD)
        GPIO.setup(self._pin, GPIO.OUT)

        self.start()

    def _flashLED(self):
        while not self.is_stopped():
            GPIO.output(self._pin, self._state)
            self._state = not self._state
            self.wait(self._duration/2)

flasher = LEDFlasher(7, 0.5)
Timer(60, flasher.stop).start()

flasher.join()

GPIO.cleanup()


JavaScript

I used pi-gpio to interface with the GPIO on the Pi in JavaScript.  It can be installed via npm. It makes use of gpio-admin so that your script doesn’t have to run as sudo.  Follow the installation instructions provided here and it should get you setup.  Note that due to differences int the languages, it was not necessary to thread (web workers) the solution.

var gpio = require("pi-gpio");

function flashLED(pin, duration) {
    return setInterval(function() {
        gpio.open(pin, "output", function(err) {
            gpio.write(pin, 1, function() {
                setTimeout(function() {
                    gpio.write(pin, 0, function(err) {
                        gpio.close(pin);
                    });
                }, duration/2);
            });
        });
    }, duration);
}

var intervalID = flashLED(7, 500);

setTimeout(function() {
    clearInterval(intervalID);
}, 60000);


The Findings – I was surprised

When I started writing the JavaScript side of this article, I was mainly doing it to gain experience working with JavaScript on the Pi.  I did not expect to come out of it vastly preferring it over my python implementation.  I find the Python implementation above to be to wordy and overcomplicated.  It just seems that the amount of code needed to achieve the same results is excessive.  Perhaps this is because of the problem scope and implementation.  The problem posed here was a simple one, where a functional solution is superior to an object-oriented one.  Could the Python code above be rewritten into something a bit more functional? Sure!  Are there problems that an object-oriented Python or JavaScript implementation would be the better solution for?  Definitely.  The lesson to take away: be open to working outside your comfort zone and pick solutions to problems based on their fit for the problem not your comfort level with them.

I’ve created a copy of the code as a Gist that is available here: https://gist.github.com/chaddotson/570501a3e3dcfe8928c8

Posted by Chad Dotson in Key Concepts, Programming, Raspberry Pi, Software Engineering, 8 comments

Project Excelsior – Technology Update

current_stack

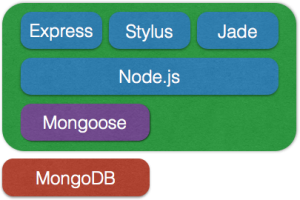
Current Project Excelsior Technology

For the past month or so I’ve been working on a little side project that I’ve dubbed “Project Excelsior.”  I’ve not had an abundance of time to spend on it over the past few week, so I’m just now wringing out some of the technology stack.  I’ve almost decided completely on the MEAN stack.  I’m close enough to a final decision that I’ve started prototyping the server side.  I’ve not worked with angular before, but I am familiar with ember and backbone.


Posted by Chad Dotson in Diversions, Programming, Software Engineering, Technology, 0 comments

No Comments – A Failure Twice

Everyone that writes code has encountered or written their fair share of undocumented code.

A failure twice?

I was encouraged to write this article because of something I read about the pinball game that once was included with windows.  According to the article on MSDN, the pinball game was removed due to a bug that should have been fixable.  However, the overall qualify of the code made repair impossible and the game was removed from the distribution.  Two major items can be taken from this:

  • Failure 1: The could should have been self-documenting / few comments required.
  • Failure 2: Code not easily understood should have been commented.

Properly commented code can be tricky!

In college they push you to comment your code while not stressing that over documentation is also bad.  I remember writing programs that had comments on almost every line for assignments.  In the end it doesn’t buy you anything, it just restates the obvious and clutters the solution.  In the workplace, comments and whether or not the code needs them are hit and miss.

Some notes about comments:

  • Many comments are an acknowledgement of your failure to communicate.  Write better self-documenting code.
  • Outdated or wrong comments are worse than no comments.
  • Consider refactoring code that’s not self-documenting.  I find one of the biggest places this can be done is extracting methods from if statements.
  • Choose a good, descriptive names.  I’m a little wordy in my names, but in the end most of my code can almost read like a sentence.

Remember

The code is your best documentation.  Think about what you want to communicate with it and how to be as clear as possible.

Posted by Chad Dotson in Doing Things Better, Programming, Software Engineering, Tips, 0 comments

Node.js vs Python vs PyPy – A Simple Performance Comparison

NQueensGraph

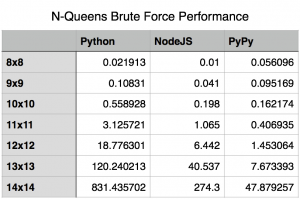
IMPORTANT NOTE: The NodeJS algorithm had a slight discrepancy in it.  See this article for a correction to the performance comparison section of this article.

The Algorithm

Yesterday, I decided to try translate my algorithm for calculating N-Queens to JavaScript.  I’ve implemented the same single-thread, brute force, recursive algorithm in many different languages with the biggest difference being the syntax of the language.  Once I completed the JavaScript Implementation, I ran the program with the latest version of Node.js.

The Findings

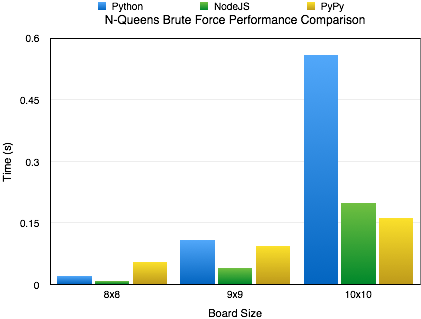
I knew Node was fast but it still surprised me.  As you can see by the included charts, the performance difference between Node.js and out-of-the-box Python is pretty significant.  Its not until the algorithms complexity and recursion depth hit certain limits that Node.js’s performance starts to falter.

Node.js and CPython – What’s The Difference?

You might ask what is behind this performance difference.  The answer is actually pretty simple.  It all boils down to how the code is being executed.  Node.js uses the V8 JavaScript Engine (Wikipedia | Google) written by Google and a part of the Chrome Browser.  V8 includes a just-in-time compiler that compiles the JavaScript to machine code before execution and then continuously optimizes the compiled code.  Python is a bytecode interpreter; meaning that the default interpreter (CPython) doesn’t execute Python scripts directly.  Instead, it first generates a intermediate file that will later be interpreted at runtime.

Ways To Get Better Performance

If you want to use Python, we can overcome the differences between Node.js and vanilla Python by using PyPy, an alternative implementation of Python that includes a just-in-time compiler.  For the algorithm I wrote, you can see a pretty good performance boost over Node.js when using PyPy.

Special Notes

  • I’ve placed my source on GitHub at the following url: https://github.com/chaddotson/puzzles
  • This is just with one type of algorithm, the best solution might and probably does change depending on what type of application you are researching.  For webserver performance, Node.js is slightly better than PyPy running Tornado.
  • This algorithm is a simple brute force algorithm, there are many faster and better ones out there.
  • At a board size of 15, Node.js could no longer run the algorithm due to its maximum recursion limit.
memory_usage
memory_usage_chart

Edit – A Follow-Up

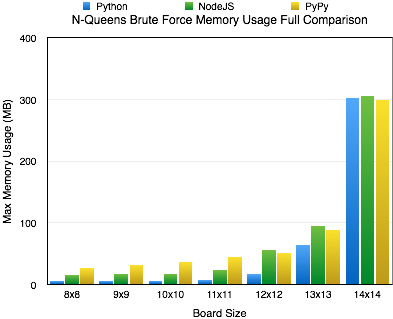
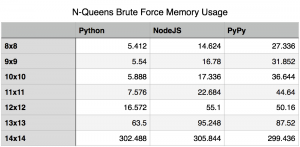
The original focus of this article was shear performance, but I’ve received a question regarding the memory footprint of the 3 methods.  I think that is a very good and valid question.  So, I reran the tests to capture the peak memory utilization by each.  For this test I used “/usr/bin/time -l” to capture the maximum resident set size.  While this isn’t exactly the peak amount of memory utilized by the algorithm, it is sufficiently close to report on.

New Findings

Upon rerunning the tests for capturing memory utilization, I found that for the most part memory utilization contrasts performance.  A higher memory utilization isn’t really unexpected, if you think about it.  Essentially, the jit is sacrificing memory for performance.  In most cases, this isn’t really that bad.  Using a jit is just a cheap way of boosting performance of code written in an interpreted language.  The boost in performance, speed of which it was written and the maintainability of it outweigh memory utilization concerns in many cases.

The Oddity

As you can see, I’ve included a chart covering all the solutions for boards 8×8 to 14×14.  During most increments in board size, the memory utilization seems to increase exponentially; however, when we hit the 14×14 board size we see all the cases level off at relatively the same memory utilization of around 300 MB.  At this time, I really don’t have a good answer for this.  I could certainly speculate, but I’d rather not until I know more.


Posted by Chad Dotson in Programming, Software Engineering, Technology, 28 comments